Monday, December 29, 2008

Holiday Cookies


 Finally, four days after Christmas, I got around to making my gingerbread cookies.  Not just men, mind you, but women and trees and candy canes and stockings, too!


I wanted to make them before Christmas, but with exams and other stressors the week before, and then the sleepover with my friends and the last minute shopping right before Christmas, I just ran out of time!  Luckly, though, Christmas doesn't technically end until January 6th, although all the clearance sales at Wal-Mart would tell you otherwise. =/


And not only did I make some delicious/adorable gingerbread cookies, but I also had enough extra royal icing to making some sugar cookies to ring in the new year.  These guys I made in time, since 2009 doesn't start until Thursday!


I used the #1, #3, and #5 tips.  I think #3 is my favorite to use to ice cookies, but I only have 2 of those and I had a lot more colors and piping bags than just 2.  I didn't use the #2 tip because Adam decided that he should wear it as a hat, but now I can't find it...  The royal icing (used with Wilton's meringue powder) was thinned to just the right consistency; I don't think I used all 6 tablespoons.  That's something you just have to eyeball, though.  Smooth, but not too runny, so it doesn't get all over the sides of the cookies.  Don't let it be too thick, though, either!


(Don't forget to vote for the Iron Cupcake: Earth challenge!)

Sunday, December 28, 2008

Iron Cupcake Voting Now Open


Please, please, please go vote now!

Voting for the Iron Cupcake: Earth December challenge has now opened at:
No One Puts Cupcake in a Corner

I am a bit biased, but I think you should vote for the Pineapple Cup{side down}Cakes brought to you by Cakes by Kelsie.

However, this month you get to pick your top 3 favorite cupcakes.  Hopefully, my cupcake is one of those three. :-)

This is going to be a short post (so you can spend less time reading and more time voting!) but I've got gingerbread cookies cooling on the racks, so you can rest assured that my next post will include some adorable gingerbread people! :-)

Saturday, December 27, 2008

Gingerbread Recipe

I've still got some leftover dough from making the Gingerbread Castle, and I plan to put it to good use by making some cute little gingerbread men and women.  Sure, Christmas is technically over, but that won't stop me from still getting into the spirit!

While I'm at work baking and decorating, I thought I'd share my gingerbread recipe, which has served me well for the past three years.  I got it from the Food Network's website:

Ingredients

  • 1/2 cup (1 stick) butter, at room temperature
  • 1/2 cup dark brown sugar
  • 1/4 cup light molasses or dark corn syrup
  • 1 tablespoon cinnamon
  • 1 tablespoon ground ginger
  • 1 1/2 teaspoons ground cloves
  • 1 teaspoon baking soda
  • 2 cups all-purpose flour
  • 2 tablespoons water

For assemblage and decoration:

  • Melted white chocolate or Royal Icing (recipe follows)
  • Gumdrops, licorice and peppermint, as desired

Directions

Gingerbread House:
In a large mixing bowl, cream the butter, brown sugar, molasses, cinnamon, ginger, cloves and baking soda together until the mixture is smooth. Blend in the flour and water to make a stiff dough. Chill at least 30 minutes or until firm.
Preheat oven to 375 degrees F.
Cut paper patterns for the gingerbread house:
Two rectangles (figs. A and B), 3 by 5 inches, to make the front and back of the house. Two rectangles (figs. C and D), 3 by 5 1/2 inches for the roof. Two pieces for the ends of the house (figs. E and F), 3 inches wide at the base, 3 inches to the roof line, and slanted to a peak 5 1/2 inches from the bottom. Four smaller rectangles (figs. G, H, I, and J), 1 1/2 by 1 inch for the roof and sides of the entryway. And one piece (fig. K), 2 inches wide at the base, 1 1/2 inches to the roof line, and slanted to a peak 2 1/2 inches from the bottom for the front of the entryway.
Roll gingerbread dough out to edges on a large, rimless cookie sheet. Place paper patterns onto the rolled out dough. With a sharp, straight edged knife, cut around each of the pieces, but leave pieces in place.
Bake at 375 degrees F for about 15 minutes until dough feels firm.
Place patterns on top of the gingerbread again and trim shapes, cutting edges with a straight-edged sharp knife. Leave to cool on baking sheet.
Place royal icing into pastry bag with a writing tip and press out to decorate individual parts of house, piping on decorations, windows, door, etc., as desired. Let dry until hardened.
Glue sides, front and back of house together at corners using royal icing. Place an object against the pieces to prop up until icing is dry (it only takes a few minutes).
Glue the two roof pieces to the pitched roofline of the house. Then, similarly, glue the sides and roof of the entryway together with icing. Attach the entryway to the front of the house.
Continue decorating the house, glueing on gumdrops, licorice and peppermint, as desired.

Royal Icing:

  • 1 pound (3-3/4 cups) powdered sugar, sifted if lumpy
  • 1 to 2 large egg whites, or substitute 4 teaspoons packaged egg whites and 1/4 cup water
  • 1 teaspoon almond extract, vanilla or lemon juice
Mix all of the ingredients together using an electric hand mixer, until the icing is smooth and thin enough to be pressed through a pastry bag with a writing tip. Add more lemon juice, if necessary.
(**I use Wilton's egg white powder and their royal icing recipe, but this gives you an alternative**)

Wednesday, December 24, 2008

Pineapple C{upside-down} Cakes

These cupcakes are so deliciously chocolately, moist, and tropical.  It's like the classic pineapple upside down cake, but better because a) there's chocolate and b) it's a cupcake.  Perfection!

The recipe is really easy too:
  • Melt a 1/3 cup of butter and mix with 2/3 cup packed brown sugar.  Spoon evenly into 24 greased (I love the Pam with flour) muffin tins.
  • Put in a tablespoon of crushed, drained pineapple (20 oz can will be enough) in each muffin tin.
  • Spoon over with the cake batter.  And it's so easy, because you can just use your favorite, yummy cake box (like I used the Betty Crocker Triple Fudge Chocolate).  And, for more pineapple-ness, use the juice that you drained out of the crushed pineapple can in the cake batter.
  • After baking at 350 degrees for 20-25 minutes (depending on your oven), run a knife around each cupcake (just in case so they don't stick) and flip them upside down on wire racks to cool.  Or you could just eat them hot, because they really are that yummy.
  • You could also put a cherry on top, but we don't have any cherries because my youngest brother eats them all.  But it would be a nice touch if you have any cherries around. :-)
If you didn't remember, I mentioned earlier that this is my entry into the Iron Cupcake: Earth challenge for December.  The awesome prizes for this year include both sweet Etsy artists and some awesome corporate prizes as well:
If you're entering this awesome challenge, don't forget to have your cupcakes submitted by today!  Good luck to everyone!

Also, as today is Christmas Eve, I would like to wish everyone a very merry, happy Christmas and I hope you all have a wonderful day!

Tuesday, December 23, 2008

The Gingerbread Castle


It's based loosely off of the Illuminated Gingerbread Castle, but I decorated it my own way.  I was going to make Hogwarts, but I didn't have the time to be architectual about it, so I just made this awesome castle that should belong in Candy Land or something. :-)

Friday, December 19, 2008

Ah-Ha! Dessert Revelations

Right now, my entries into the Iron Cupcake: Earth Challenge are in the oven.  And they will be delicious, I'm sure of it this time.

And there are cake balls in the freezer just waiting to be covered in chocolate and eaten. ;-)

Also, I just decided, not even an hour ago, that the gingerbread house that I'm making this year is going to be a castle.  Not just a house; not even a mansion; a full-blown castle-- with towers and everything.

And it's going to have little gumpaste figurines and ice cream cone trees and lots of candy and royal icing decorations.  Adorable, right?

Speaking of gumpaste, I actually went to Michael's last Saturday and bought some cake stuff:  parchment bags, piping bags (the disposible plastic kind), and ingredients to make my own gumpaste (I think it's glucose and tylose powder).  I know that the ingredients are more expensive than the pre-mix, but in the long run, I think I'll come out on top.  Yeah, sure, and the process seems longer, too, but again, the effort and the initial investment will pay off in the end.  However, I do owe my dad $40 from the entire shopping trip.  And I owe my mom almost $30 for something else...  Ah well, the price you have to pay to be a cake decorator/buy your friends Christmas gifts.

OK, so I'm going to go check on my chocolate cupcakes.  I'll be back later with pictures and the recipe!

Sunday, December 14, 2008

9 Month Anniversary Cake

9 Month Anniversary Cake, originally uploaded by Kelsie <3.
Happy 9 Month Anniversary to Josh and Emily!

I had a lot of fun making this cake, which Josh asked me to make last week as a surprise gift for his girlfriend. It's amazing to think that just 24 hours ago, this cake was only two layers of vanilla cake cooling on the counter. Look at it now!

I was really pleased with how classy and elegant this cake looked. I wasn't really sure at first how to go about things... all I knew was that I needed a pink cake with flowers on it to be delivered after church tonight.

So I perused Cake Central, and saw a pretty 50th anniversary cake with all the swirls, which is partly my inspiration. By the way, I freehanded all the scrolls with a #3 tip. I just kind of went by what was in my head more than any set pattern or any pictures that I saw. The dots/pearls are either #3 or #5, I can't remember which.

The green is actually left over from the Advent cake that was still in the freezer, but I added some juniper green icing paste to make the color less spring-y (something that bothered me a teeny tiny bit when it was used for the wreath).

I owe a lot to Katie for the flowers. Originally, I was going to do dark pink or yellow flowers, and probably fondant ones too, but Kate convinced me to make white buttercream flowers. (She says the buttercream ones look prettier, but I'm not so good at making them.) The gold dust came later when I was testing a rose, just to see how it looked. Well, it looked gorgeous, so I colored the other roses just the same. For the final touches, I added some green leaves, and, ta-da! I was done!

(Secret tip: instead of using a blob of piped icing for the roses' centers, I used Hershey's kisses. Yummy!)

I really hope that Emily loves the cake as much as Josh did when I gave it to him. He was so excited! I'm really glad that he asked me to help him celebrate doing what I love best! ;-) And just like the cake says, "Happy 9 Months!"

Thursday, December 11, 2008

How to Make Your Cupcakes Moist

Like I referenced in my earlier post, cupcakes dry out faster than cakes because they don't have that layer of icing to seal in the moisture.  One way of making your cupcakes less dry is to add more liquid to the batter.  Some other tips that I picked up include:
  • Baking the cupcakes at a higher temperature for less time and take them out as soon as they're done-- not a minute later. (15 minutes at 375)
  • Make sure your batter isn't too heavy.
  • Put a small Pyrex dish with some water in the oven on the lowest rack while baking for added moisture.
  • Don't overbeat the batter! (This is true for regular cakes, too)
  • Use oil instead of butter.

My "chocolate with a twist" cupcakes are coming along really well, but they're not done yet.  Actually, they are super dry, which is why I made this post.  I think I'm just going to have to try, try again.

Oh well.  I forsee chocolate pineapple cake balls in the future.  Oops.  Did I just spoil the surprise? ;-P  Yes, I'm making chocolate pineapple cupcakes, because pineapple is my favorite fruit.  I just need to tweak the recipe around some more for Take II.  I also need to decide if I want to use pineapple buttercream or chocolate ganache for the icing...

In the meantime, I have a secret anniverary cake that I'm making for one of my friends.  It was pretty cool of him to ask me to make the cake for the occation. :)  Pictures of everything coming soon... (Sorry I'm not blogging much these days, but it will be easier after finals are through, I promise!)

Saturday, December 6, 2008

The Secret Life of Cake

So yesterday I was watching "The Secret Life of..." and the episode happened to be about cake!  It made me happy. :-)

I didn't actually watch the entire episode because I had some other stuff going on at the time, but that's what TiVo is for, right?  Anyway, I did happen to see the part about Chicago's Cupcakes, and I learned something very important to cupcaking.  (Yes, I used the word cupcake as a verb.)  Are you ready for this intense cupcake-related secret that could change your entire baking world?

Well...  Cupcake batter needs to have more moisture.  That's it.  Cupcakes dry out faster than cakes because cakes are totally covered in icing to lock in the moisture.  Cupcakes, on the other hand, are only iced on the top, so that moisture can seep out.  Therefore, one should add more liquid to cupcake batter in order to make them moister. Now I feel a lot better about my cupcakes always tasting drier than my cakes.  It's not my fault, I just didn't know the secret.  OK, so it is my fault because I didn't know the secret, but that's all about to change.

And speaking of cupcakes, y'all know the next Iron Cupcake Challenge is coming up:  Chocolate with a Twist.  And I have a fantastic idea.  I just need to go to Costco and buy some ingredients.  I won't tell you what I'm making just yet.  You'll have to wait for the wonderful surprise. :-)  I can tell you how I came up with the idea, if you'd like to know...

I was walking down the hallway at school, thinking about how my little siter got a Chocolate Peppermint milkshake from Chick-Fil-A and how much I wanted one, because I just love the combination of chocolate and mint.  And then I remember that the ICE challenge was about a chocolate + something combination, and what other interesting flavor combinations can be included with chocolate, and BAM!  I came up with my idea.  It's making my mouth water just thinking about it, actaully.  And these cupcakes will be so moist and delicious too...

Tuesday, December 2, 2008

Fondant Festivities

 
The title might be a little misleading.  The only fondant on this cake is the 4 candles and their "flames."  But I couldn't really come up with a better title since I used "Happy Liturgical New Year" for last year's Advent cake.
And, if you're a long-time blog reader, you might remember something else from that cake which I made one year ago:  I had some crazy cake ideas.
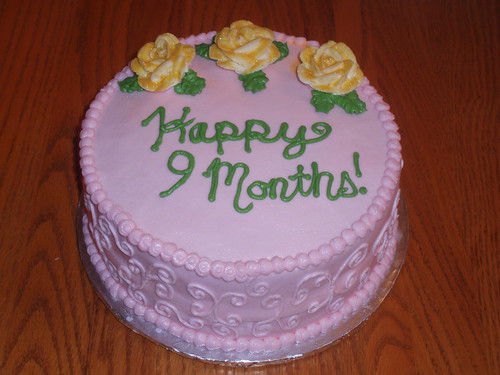
A year ago, I didn't really think what I would be doing in 2008.  I was a bit too preoccupied with 2007, although the promise of my last year in high school did excite me.  But I'm talking about cake.  Last year, when I said that I wanted poinsettias and fondant candles, I didn't think that a year later, I would make the perfect cake.  I just thought, oh well, this cake is nice.  And if you're not a long time blog reader, then I'll show you what I mean:

Yeah, I know.  It's a far cry from what I made this year.  Wow, when you look back like that, you discover how much of an amazing difference a year really makes.  Okay, I'm done reminicing.  It's time to talk about the Cake of the Moment...

 
This cake has got to be the best one I've made.  (I say that a lot don't I?  About the purple cake, and the Patrick cake, and the penguin castle cake...  But I mean it this time!)  First of all, the cake mix was great.  Such a deliciously moist chocolate cake!  And then, the oven cooperated.  It had some help, of course.  Halfway through the baking process, I turned the cake pans around so that it would cook evenly on both sides.  And it helps that I have the nifty new cake pans, too.
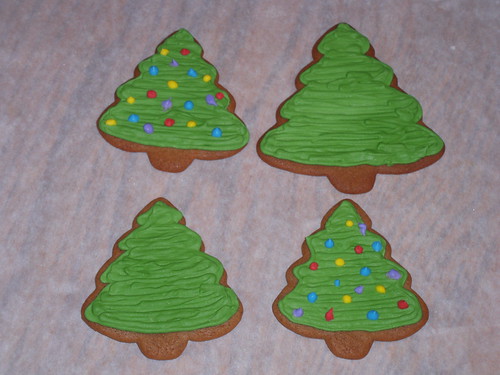
The icing was very nice to me.  I actually posted a recipe over here, if you want it.  The green wasn't quite as friendly as the white, but much less of a grouch than the red.  I need to get some dark green 
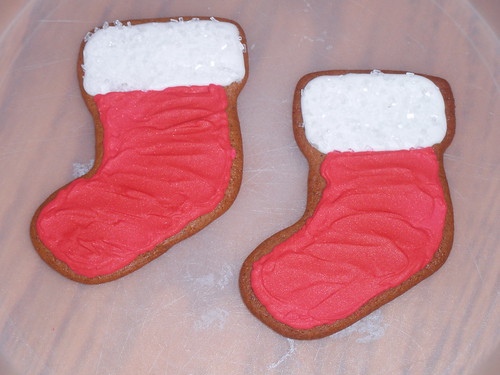
icing paste (kelly green? moss green?).  The red, I have to admit, came from a Betty Crocker tube.  I was lazy, and I had a coupon, so I bought some red icing.  That came back to bite me, though.  The red icing bled some because of the cake's high moisture content.  I suppose I should have let the icing crust over a bit before putting the cover over it.


The bleeding cake really would have been a problem, because I didn't take the final pictures until the day after I made the cake, when I finally added the candles.  Thankfully, the bleeding was only on that side of the cake, so I just turned the cake around for the photo shoot. :-)

Speaking of fondant, I have a word or two to say about that.  I don't know how Duff does it.  When I watch Ace of Cakes (I kind of had a tivo maraton of the show on Sunday, before eating the cake), I watch with amazement as the artists deftly put smooth fondant all over the cake.  My fondant is never that smooth, which I just can't understand.  Maybe it's because (this time at least) I used some old gumpaste mixed with the fondant in order for the candles to dry and stand up straight.  (I made the cake and the candles on Saturday and served the cake on Sunday.)  I'm really not sure what the problem is, but it's frusterating.

Finally, the cupcakes:
 Yes!  I finally got to make my poinsettias!  They were a little droopy, and before I added the leaves and center dots, my mom thought they were octopi, but for my first time, I think I did really well.  Some of the cupcakes are also holly leaves, because I was running out of red.  Actually, they aren't really holly, because they don't look like the traditional holly leaves.  I just took the leaf tip (I can't remember what it's called, but it looks like a bird's beak) and squeezed out a bunch.  That's basically how I did all the leaves on the cake/cupcakes.
Wow.  I was really talkative today.  Sorry about that, but I guess I was just excited about finally making this dream cake. :-)  I'll stop raving and tooting my own horn about how wonderful this cake was.  I'm looking forward to whatever is next in my baking future, though!